Oops! Something went wrong while submitting the form.
By entering your email we'll also send you marketing emails related to Spocket, subject to our Privacy Policy. You can unsubscribe anytime.
Case Study
How I made $178,492 in three months by dropshipping US and European products
By
Isha Mandloi
Marc Chapon was just like any other entrepreneur starting out on the journey to a successful online business. He had studied Hospitality/Restaurant management in Paris and Switzerland and the most he knew about marketing were the basics the course had covered- and now, he had quit his full time job and ventured into ecommerce, with no shortage of determination and enthusiasm.
In less than a year, he was making sales worth 60 thousand dollars per month- with purely marketing and testing on his side. He now has a course on Spocket Academy detailing how to grow your business from zero to selling thousands per month.
In one single day, he made over $10,000 in sales:
We wanted to map out his journey, right from square 1 to the successful businessman he is now. Here’s his story, tips and tactics of how exactly he built the store- in his own words.
When I entered ecommerce, there was a huge amount of information on the internet: loads of scammers and get-rich-quick courses out there. But everything you need to learn about this market is out there on the internet as well- there are legitimate courses and blogs that can push a new entrepreneur towards success.
There is everything you need to know on the Internet. If you look for it, you are going to find it.
There are Facebook groups, YouTube videos, courses- all to help you build your e-commerce business:
I am going to spell out how I created a business that I made a living out of, step by step.
Step 1: What was the budget for your store? How much does one need to build a successful store?
When I quit my full-time job to try my own business, I did not venture into it blindly.
Now, a lot of supposed ‘ecommerce gurus’ will tell you that you can start a successful business with a zero dollar investment- but any rational entrepreneur will be able to tell that you need funds to start any business: with ecommerce, you do not needs tens of thousands to get started, but you will still need about $1000 to make it through.
I had set aside about $5000 just for my store, but about $1000 was enough before I started making sales to cut even. You will need money to get yourself a Shopify store, and run ads on Facebook: zero investment is a stretch.
Trust me, building a business from ground up is going to require basic funds: anyone who says otherwise is oversimplifying the business.
However, I did not spend funds on acquiring products and holding inventory. If I had to sell online, I would be using the dropshipping model. I had heard about Spocket- through which I could find products and kick off my store at no upfront cost: but first I had to select a niche.
Step 2: How did you select a niche for your store?
I have often heard people say ‘This is a good niche’, which always confuses me because there is no good niche or bad niche.
There are no saturated marketplaces, and not even the most in-demand niche would work for a retailer who is not putting in effort into marketing and building a reliable store.
My rule of thumb while selecting a niche is that I had to be interested in the niche to start a store in it: a lot of people do not think this is an important criterion when choosing a category for their store, but I have found that passion precedes any successful business, so if you choose a niche that you do not know anything about, you’ll probably not be as invested as you should be.
Plus, when you start with something you already like, you’ve covered the A-B-Cs and have an advantage over entrepreneurs that are starting from scratch.
With all this in mind, I still had a few niches that I could take on- art was a major interest of mine, so that niche was on the table. I also loved animals and had a dog and cat of my own, which was another category that I could dive into. I was (and am) "living in the niche" and knew everything about it- especially the needs and problems that dog owners experience on a daily basis.
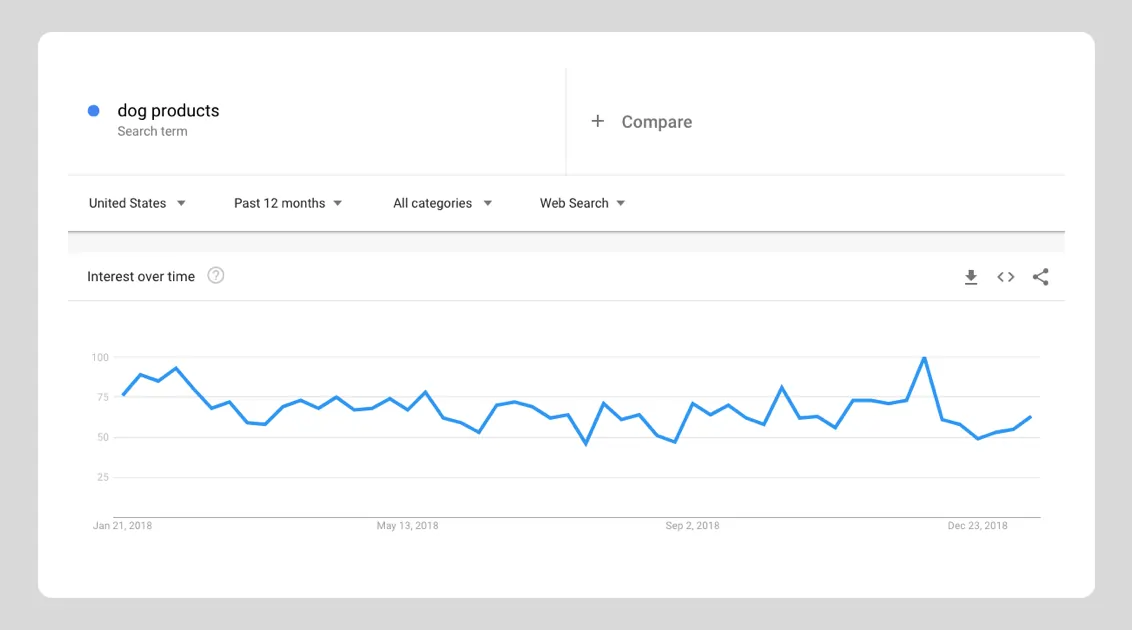
Products for dog lovers were trending and so, after some research, I chose dog-focussed products as the theme of my store.
Google Trends strengthened my conviction:
Another thing to note is, you might be tempted to kick off your store with a current passing trend, but with that, you must be content to make a lot of money and then drop off the face of the Earth.
A sustainable business is possible if you choose a niche that is consistently doing well.
I did considerable research into the field: right from checking out Amazon and other popular sites to see how popular the niche was, to going over revenues generated by the niche over the past years.
To research a niche, I usually do the following:
Google the main keywords, check out major companies that sell the products
Check the amount of traffic they generate
View the global searches for the keyboards
Review the amount of revenue the niche creates per year online
Check the profitability of the niche
The traffic was great, and it seemed like a reasonable profit could be made with the category. Once I had thoroughly researched the niche, I settled on all things dog related.
Step 3: How did you hone in on your target audience?
This step actually went hand in hand with the first step.
Simple Google searches led me to competitor stores, where I could check the reviews left by audiences, and find out who was majorly attracted to the dog niche. Further competitor research showed exactly who my competitors were targeting, and what they were doing successfully.
Being a pet-owner myself, I had a fair inkling of who required and was interested in the products I planned on selling. With a heady combination of Google Trends and common sense, I figured the lifestyles, personality traits and attitudes of the people that were likely to buy my product.
The thing is, you do not need tonnes of data to hit the right audience. But without the right audience, dropshipping success is impossible. My audience was based in the US or Europe, aged 21-65, often followed dog accounts on instagram and shopped at PetSmart. This was great for a start- I kept testing and diving deeper as time went on.
If you have a bad product, not even the most gorgeous looking store can sell it.
This problem, again, was resolved by Google. Though I started looking at products on AliExpress, I did not want the generic low quality AliExpress products that were available in 500 different stores. Owing to the choppy product descriptions and bad images- not to mention the uncertain shipping times, I decided to not to have any of those products on my store.
I needed manufacturers based in the US and Europe, with great products and low shipping times. A simple Shopify app store search led me to Spocket. One of the things I was going to be selling was dog tags, and Spocket had an interesting collection of dog bracelets, tags and necklaces- all shipping from the US. They also allowed me a fair profit range, which was important.
Plus, I found customizable products.
I immediately set out importing products to my store.
I also had a look at other apps on Shopify such as Oberlo, but they did not meet the criteria I had set for my products. Between Spocket and Oberlo, I found Spocket to be a better fit for my needs.
I hunted for local suppliers and Etsy artisans on Spocket to fill my store. I checked the trending products on Amazon, and found suppliers selling them within the US at different rates. Again, you do not actually need 20,000 products to be a successful store. A good number, such as 25-50 amazing products worked perfect for me.
The best part about Spocket products was that I did not have to worry about product images or supplier reliability.
I sought reviews and researched competitors and chose products that always led to happy customers. Dropshipping is all about the product, so I made sure to choose suppliers I trusted entirely. Winning products are a mixture of the right product, the right audience and the right marketing, and I did not want to get even one of these wrong.
I spoke to the suppliers to ensure that they were someone I was comfortable working with, and collected products that were special and unique. Of course, I also occasionally chose products that did not sell well, but that is all part of the learning curve.
Step 5: What went into building the store?
Shopify was the obvious choice as a website builder. Easy to use, and quick. I picked up the theme- Brooklyn and set about designing the store. People often spend a lot of time designing and perfecting how their store looks. But the truth is that as an ecommerce business, your store needs to look professional and trustworthy, but you don’t need to go overboard.
Your site needs to load within 3 seconds, that’s really important!
So I spent some time constructing a site that had all the essentials, minus the fluff. These are the steps I followed:
1. Create a homepage:
A homepage is the first impression people have about your store, so this part is quite important! I was always interested in design so this was the exciting part.
A lot of people just list products on their ecommerce store: that is not a store, that is just an accumulation of products.
I first inserted a high definition picture from a free stock photo website such as Unsplash at the top of the main page- this was the first thing people would see when they landed on the site, so it had to be related to my niche, and attractive.
I then added a small tagline and a CTA button on that image that would take the visitors straight to the products.
This is what your store’s homepage should look like, right above the fold:
I put up collections with equally attractive pictures on the homepage, under the main image that took the visitors directly to the respective collections.
I made the navigation bar sticky with the primary sections accessible easily to all visitors.
As added value, I created a dog owner’s guide that any visitor could download for free.
Colour: My audience consisted of dog-owners from all genders and ages. I selected yellow as it represented happiness and optimism and a muted shade of brown for earthiness. Most importantly, I used white spaces in plenty. This seemed to be a great fit for the store I had in mind: healthy and clean.
Name:The business name is something that is intuitive- that sounds good, and conveys what you want. For privacy purposes, I will be unable to reveal the exact name of my store- but a good name for a canine-themed store would be ‘Puppy Love’.
Font:I selected the font ‘Now’- Bold and Light for headings and subheadings. This font was easy to read, and did aligned with the clean white rustic feel that I was going for.
Logo:The logo was something I quickly whipped up in Canva: While the logo is an important part of the whole brand package and should be unique, spending large amounts on it as a new business is pointless.
I took an icon, added my company’s name- and voila, a logo was ready!
Lastly, any online store should have amazing HD photos on their site to achieve ecommerce success. I used Unsplash, Canva and Pexels for the same!
3. Product Descriptions:
While researching, I had come across a number of ecommerce stores that simply copy pasted the product descriptions from the supplier’s store- usually AliExpress. This meant that the product pages were generally littered with irrelevant information, and no USP. Online shopping demands that product descriptions be crisp.
My formula for creating product descriptions was simple. Product descriptions have to do more than just talk about the product: they have to sell the product or service, prove that the product is worth buying and will bring a significant change in the customer’s life and show them why your product is better than your competitor’s.
So the first two lines of all my product descriptions simply expanded on the benefits of the product in the customer’s life- followed by the actual utility of the product.
Spocket descriptions were grammatically clean, and covered all the points I mentioned above so I did not have to work around them much.
Only after these two points are covered do I go for the specifications and details. I recommend using bullet points to make the information navigable.
Huge chunks of text are a big turn-off.
4. Product Photos:
With US based suppliers, or suppliers from Europe, you do not have to worry much about product pictures. Ordering a sample of each product would have required too much effort and money- instead, I simply requested the suppliers for newer pictures.
If I had chosen AliExpress products, I would have the need to order a sample for every product on my store to ensure that the shipping time and the quality matched my standards- but with the US Spocket based suppliers, it was so much more smooth-sailing.
Once I had the product page skeleton ready, I simply inserted all the products I had to fit the template.
Step 6: What payment gateways did you use- and are they any other essential pages that a store should have?
Yes- the last step to complete my store was setting up the payment gateways, an about page, customer service and the return policies.
I started out with PayPal and 2Checkout, since I was unable to use Stripe as I was in Morocco at that period in my life. I really do recommend having a credit card payment available- and the easiest way to do it is register a business in a country that Stripe can operate through. You do not need to be physically present to have a business in a country, and you can have a bank account there without much effort.
Allowing multiple payment methods is definitely a plus, but if you’re just starting out, PayPal works. I also added assurances on the checkout page so that trust would not be an issue in completing a purchase:
Risky, untrustworthy payment gateways are a big hassle, and I incurred quite some problems with the same.
I created an About Page because nothing can substitute a personal touch to a store, and had return policies and other FAQ put in order to ensure that credibility was not a hindrance.
Step 7: What did your marketing plan look like?
My marketing plan had three major elements- Facebook, Instagram and email marketing. Once I had my site ready, I did not want to dilly-dally with pre-launch giveaways and other schemes as no one knew my store at the start. I had to work on brand awareness first.
Facebook and Instagram ads:
Social media ads are easily the best mediums for your store to generate sales: with a huge reach and comparatively quick and inexpensive.
Product images and videos with enticing copy work great as Facebook ads- here is where amazing product photos come in.
Three things I learned with Facebook and Instagram ads are:
Test out the audiences that you are displaying your ads to- usually people change the creatives, the copy of the ads if the ads seem to fail, but the problem is quite often embedded in defining the target audience. I tested out gender and interests alone out of all audience variables and hit jackpot.
It depends on the product: some products do really well on instagram. Some bring crazy traffic from Facebook. Optimize your ads for the platform they do great at: and if a product is bringing you only scattered sales even after a month: if the amount you spend and the amount you earn over that product is not breaking even despite some run-time, perhaps that is not the right product. You might like a product, but your audience may not. Don’t waste funds on pushing the product- try a new one!
Don’t overcomplicate it! I always have plans for every letter of the alphabet: don’t spend ages strategizing how your Facebook ads will look. Take action- if one thing doesn’t work, move to the next. I created 4-5 ad sets with different audiences for every product and ran them, getting quick data and realigning my plans everyday based on the outcome.
Here is an actual ad campaign I ran, step by step:
Campaign Objective: If you are running Facebook ads for an ecommerce store, your motive is to get results. Consequently, I chose conversions as the campaign objective.
Demographics: With the niche I had chosen, I did not need to sort audiences by gender. I was primarily shipping to the US and Canada, but was also open to sales from the US, Australia and New Zealand.
Targeting Strategy: My audience was most likely to know about PetSmart or Petco, considering these two brands are top ranked for pet products. I added these as interests along with other common interests.
Placement: I targeted mobile devices as people as mostly browsing Facebook on their cell phones. I did not need right column ads or instant articles- feed based ads were enough. For Instagram, however, where a number of pet accounts are born everyday, I chose both feed and story ads.
Ads Copy: This is a step a number of online retailers botch up. Your ads copy should be limited to a few sentences- whole paragraphs are never read. I used emojis as other articles in the audience’s feed also use emojis- they are more likely to read your ad if it is perceived as another post on their feed.
I first hooked the audience in with an emotional statement- every owner wishes to keep their dog safe. Then, I added an element of urgency with the discount and the stock.
Budgeting: My daily budget for the ad was $3, so that I would be only spending $84 per month, which I could afford, owing to my savings. I decided to spend 100 dollars on each product. I started with 4 ad sets (3$ each). I used to test 3 products a week after a lot of research on products. I chose the Lowest Cost Bid Strategy for efficiency. While it might be unstable, I preferred this to the target cost bid strategy for the simple reason that it would have cost me more per event.
The Instagram audience is younger, so I kept track of trends in youth within my niche, and similar products performed well on Instagram- while Facebook caters to the middle-aged crowd.
If an ad performed well and brought in profits, then I let it be- no silly business with it. With really precise audience demographics, you can have as much as a 11% conversion rate- although 2-5% is what you are aiming for!
With Email Marketing, I sent out 2-3 emails per week to my email list: fun newsletters and cute with curations of cute dog videos and tweets.
I tried to give value to people by teaching them something that was unknown to them (this is why one needs to know about the niche they have a store about) and then added a cheeky bit about how my store also had products that would be perfect for the potential customer.
One can also provide value through community forums such as Quora or post on Pinterest- that helps immensely with brand awareness.
Step 8: How did you deal with Abandoned Carts?
With abandoned carts, it is tricky.
The first thing is, of course, retargeting. I started retargeting through a varied number of media: first of all, there were emails. I had collected email IDs and phone numbers at checkout, and also on the homepage: so different segments of emails went to users who had reached the shopping cart but had then abandoned the sale and to users who lingered on the website but then left.
I also deployed SMSes, WhatsApp and Messenger which are under-appreciated media and tested the copy out.
Plus, Facebook ads. They really couldn’t miss my message. I made it easy for the customer to buy directly from the message or email, so they had the ability to purchase right at the place where my store met them.
This is how an average abandoned cart message looks for my customers:
I also paid attention to the product that suffered the maximum abandoned carts, and formulated multiple reasons why the product was being abandoned at the last stage.
One product that was selling alright had a number of abandoned carts- this showed that the product did have potential to make way more sales. After multiple tests, I found that it was the cost of the product that was too high. Unfortunately, the supplier was refusing to give a further discount. So I reduced the price on my own store and took a deliberate loss.
Once I had enough sales for the product, I proved to the supplier that a further discount would benefit his business: and then, I covered all my previous losses and more!
Take risks, and don’t be afraid to try new strategies!
While I had seen a lot of retailers put up multiple pop-ups on their store, right from scarcity timers to social proof pop-ups, I chose to keep the ‘urging’ to a minimum. This is because I did not want to appear pushy or desperate on the store.
I only employed the scarcity principle in two places on the store: One, on the product page, with a ‘Only X products remain’, which is a true reflection of my inventory at any moment, and two, on the checkout page:
As for tools, I used a couple of upsell apps- they do slow down your store, so I minimized their usage.
Two Upsell Strategies that I used were:
- Upselling on Shipping: I quickly realized that shipping costs are the worst part of the total sales cost, and people are often eager to reduce those. People justify adding another enticing product to their cart with money saved on shipping if they receive a reduced shipping rates- so that is one strategy I use. Faster shipping is another motivator.
- Cut-off Point: I also occasionally have banners stating a certain percentage off if a customer purchases products worth a certain amount.
I used Spocket to find and import products- I did try the AliExpress app, but I had different products in mind for my store. With Spocket, I found some of my best-selling products, and when the orders started pouring in, I could easily fulfill the orders in one-click. I did not have to waste time unnecessarily on manual work, and never worried about inventory: for the stock was updated in real time.
The second app that I used was Loox: to add photo reviews and making them look clean. In the world of ecommerce, reviews are extremely important as they provide the social proof necessary to establish trust. Loox was easy to use, and automatically sent my customers an email requesting a review.
I also used Mobile Converter by Beeketing, which helped optimize my site for mobile devices. More than 50% people shop through their mobile phones nowadays, so a sticky Add to Cart button and full sized image galleries were absolutely essential.
Third: Recart Messenger Marketing helped with abandoned carts. As I mentioned above, I wanted to reach abandoned carts through all media: I sent emails, FB messages, SMSes- and Recart tackled FB messenger. I customized the messages to suit the theme and colours of my store, and brought people back to the store in the middle of, what I presume would have been, a Facebook scroll session.
And lastly, SMSBump was my go-to app for sending SMSes to abandoned carts! SMSBump works great with ReCart and retailers can create a sequence of SMS + Messenger where a message can go first and if a customer does not convert we hit them up with ReCart. Texts have a 94% open rate- and so few people employ this amazing resource- this app was one of the most important ones for me.
Step 10: What was the final result and what should new retailers keep in mind as they start their stores?
Within, 6 months final result was plain- all the effort had paid off:
Any business is a sum of all the tiny efforts you put into it: from design and development to marketing and sales. If people’s ‘dropshipping success stories’ claim that one single revolutionary trick is going to win you success in a second, they’re probably lying. These success stories are usually fabricated to scam people.
Throughout the months, I applied and reapplied all the different strategies stated above, and more- and the results were clear as day.
Not only was I creating enough profit to sustain a comfortable lifestyle, without a 9-5 job, but also surplus profit. In the three months from October to December, I gained $178,000 in sales.
But just like any business, it required patience. Dropshipping isn’t just a quick way to make money. You have to be organised and keep your finances in order.
I did not know how long it would take, and I am not going to deny it was hard. But it is possible.
I started out just like you: I made countless mistakes along the way, admitted them, and corrected myself. My biggest problem was the missing knowledge- ecommerce was like flying blind. I tried new things everyday, tested new ideas and was determined to make it.
My mission now, is to prove that anyone can build a successful ecommerce store through dropshipping. With tools like Spocket available, ecommerce success is right at one’s fingertips. Through my Facebook group- Dropshipping Elite and Spocket’s Facebook group, I hope to spread all that I have learned in my journey to successful business to all fellow entrepreneurs. You can be the next dropshipping success story on here. If you want to learn exactly what I did with step-by-step instruction, my course is available on Spocket Academy.
Learn how to start and grow your own e-commerce store!
You're in! Look out for our emails to help you get started with your e-commerce store.
Oops! Something went wrong while submitting the form.
Isha Mandloi
Isha is a content creator at Spocket. She is passionate about helping entrepreneurs build and scale their businesses. She creates insightful content focussed on ecommerce, marketing and growth.


.webp)
.webp)


.webp)


.webp)
.webp)


